
Deploy a Publii site
Publish a Publii site on your own domain. Publii renders the site to a folder on your computer, and you deploy that folder from the command line or the portal.
| Build | Sync your website in Publii, with the server set to Manual deployment |
| Output folder | <your site>-files, inside the output directory you choose |
| Settings you need | Your website URL set to your domain |
| Routing | Trailing slash, if Pretty URLs is on |
Before you begin
Section titled “Before you begin”You need:
- A Publii site that renders on your computer.
- An Evolving Edge account that can deploy workloads. See Getting Started.
- A project in the portal, and its project ID (it starts with
proj_). - A deploy token from the portal, under Workload → Deploy Tokens, with
workload:write. Scope it to the project. See Deploy tokens. - The domain you want to serve the site on, for example
www.example.com, and access to its DNS settings. - Node.js 22.12 or later, on Windows (x64), macOS, or Linux (x64 or arm64), to deploy from your computer. To deploy from the portal instead, you don’t need Node.js.
1. Keep the site folder out of iCloud
Section titled “1. Keep the site folder out of iCloud”On a Mac, Publii keeps its sites under ~/Documents/Publii by default. If iCloud’s Desktop & Documents sync is on, iCloud syncs every file Publii renders, and two things go wrong:
- Packaging slows to a crawl. macOS checks each file with iCloud as it’s read. A 419 MB blog took minutes to package with almost no CPU in use.
- Numbered copies appear in the output. When Publii rewrites a file while iCloud is syncing it, iCloud can keep both, as
photo 2.webpbesidephoto.webp. In one site, 964 of 2,073 rendered files were copies like this, and they’d all be deployed.
Quit Publii, move the Publii folder somewhere iCloud doesn’t sync, for example ~/Sites/Publii, and choose the new location in Publii’s settings. The same applies to Dropbox, OneDrive and other sync folders.
2. Render with manual deployment
Section titled “2. Render with manual deployment”With manual deployment, Publii renders the whole site to a folder on your computer, and uploads nothing.
-
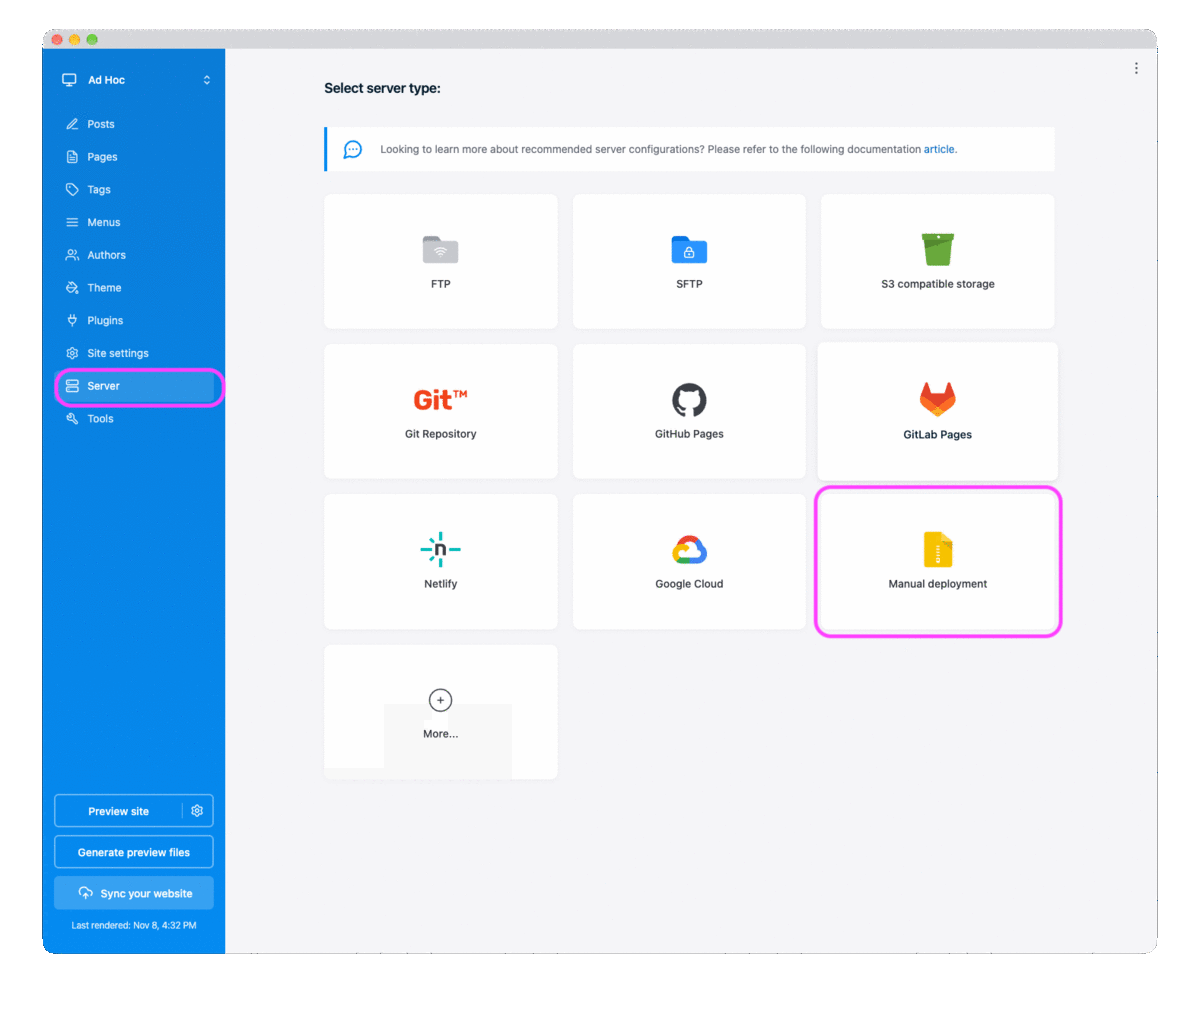
In Publii, open Server and choose Manual deployment.
-
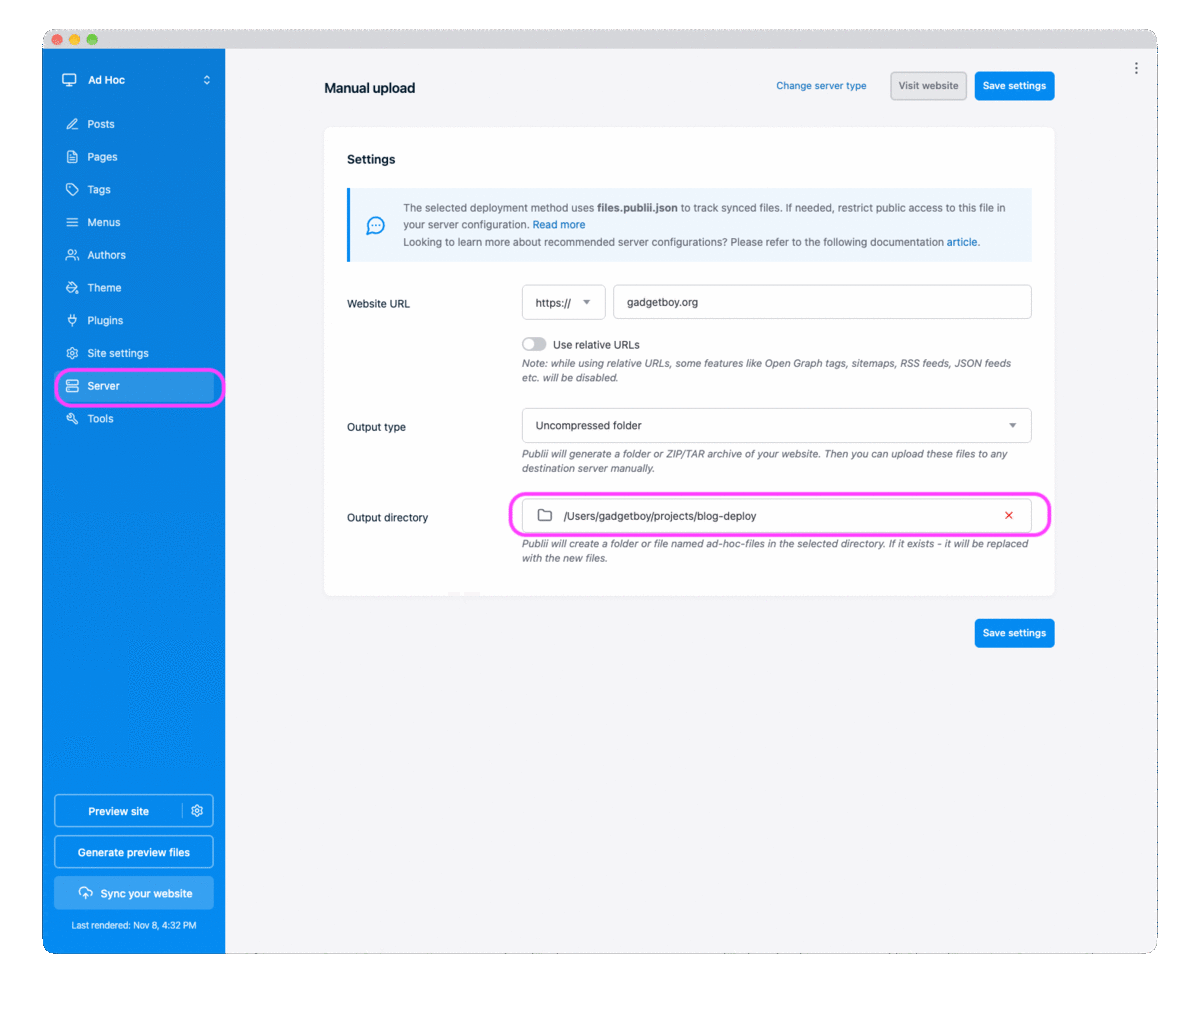
On the Manual upload settings, set:
- Website URL: the address visitors use, for example
https://www.example.com, with or withoutwwwexactly as you’ll serve it. Publii writes it into feeds, sitemaps, Open Graph tags and canonical links. - Use relative URLs: off. While it’s on, Publii leaves out Open Graph tags, sitemaps, and RSS and JSON feeds.
- Output type: Uncompressed folder.
- Output directory: a folder outside iCloud (step 1). Publii writes the site to a folder named after your site inside it, for example
my-blog-files, and replaces it on every render.
Then Save settings.
- Website URL: the address visitors use, for example
-
Click Sync your website. With manual deployment, that renders the site to the output folder. Check that the folder holds
index.htmlat its top level.
3. Turn on the trailing slash for Pretty URLs
Section titled “3. Turn on the trailing slash for Pretty URLs”Publii’s Pretty URLs setting is under Site settings → Advanced options → URLs as Use pretty URLs. Leave Always add index.html in URLs, just below it, off: it’s only for servers that can’t serve a folder’s index.html.
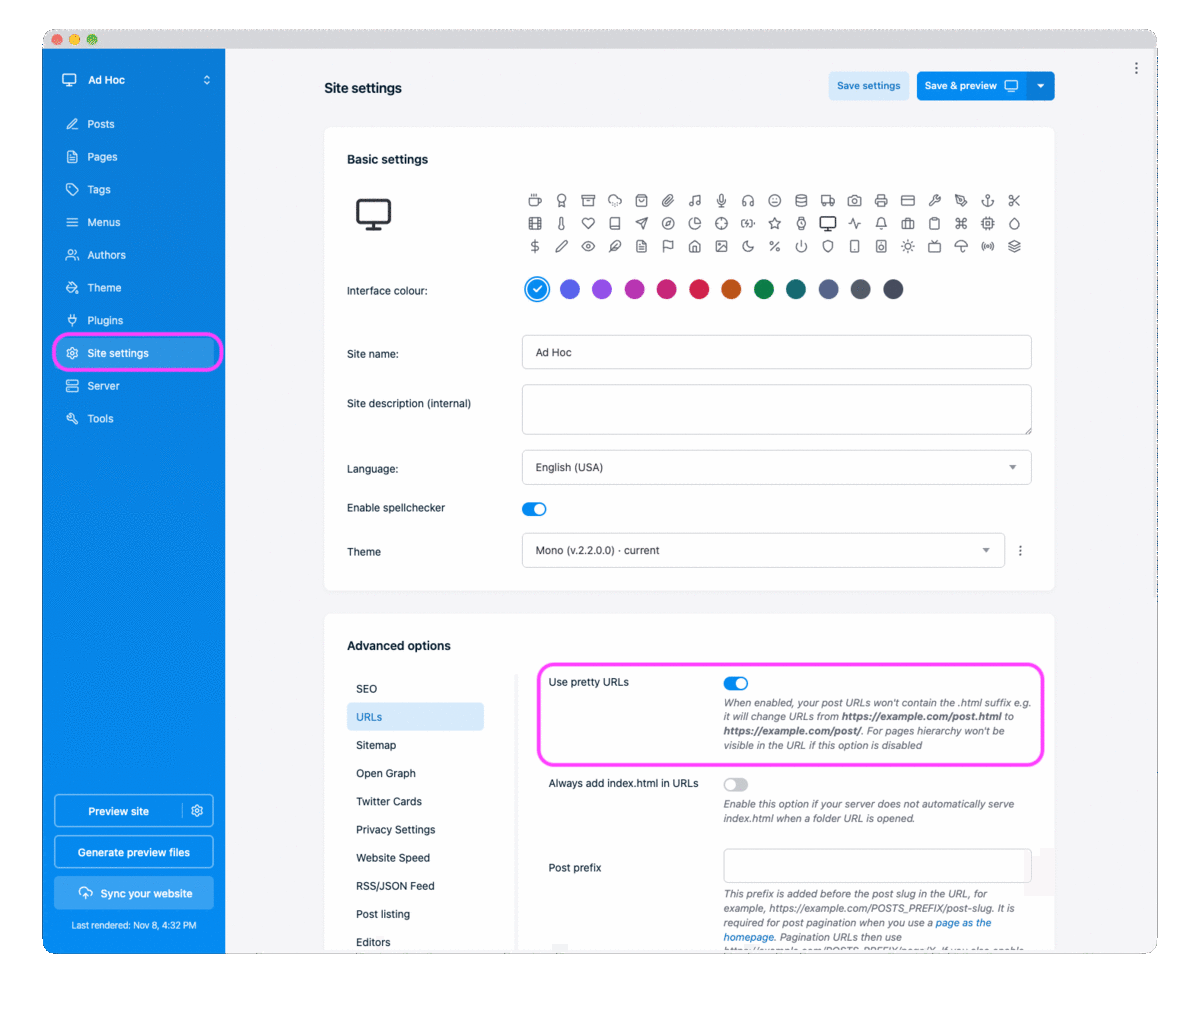
With pretty URLs on, Publii writes each post as a folder (my-post/index.html, served at /my-post/). Without a setting, /my-post with no slash is a 404. Two ways to fix it:
-
From the command line: add
--trailing-slashto every deploy (step 5). -
For every deploy, including from the portal: add a
_redirectsfile to Publii’s root directory, which Publii copies to the top of every render:-
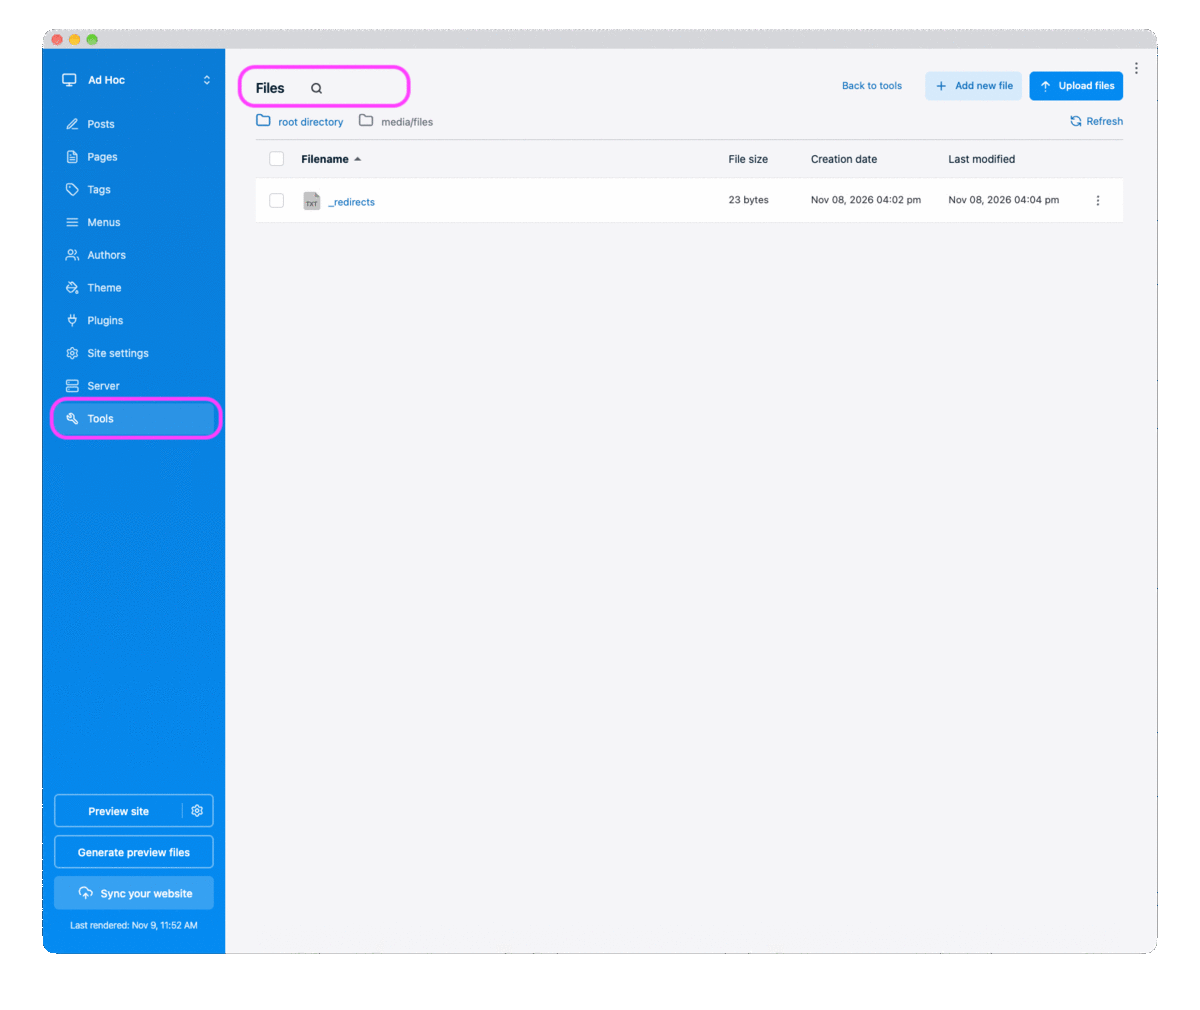
In Publii, open Tools, then Files, and choose root directory.
-
Click Add new file, name it
_redirects, with no extension, and give it this one line:# ee:trailing-slash onOr create the file elsewhere and add it with Upload files.
-
Sync your website, then check that
_redirectsis in the output folder.
-
With pretty URLs off (my-post.html), skip this step.
4. Claim your domain
Section titled “4. Claim your domain”Only the project that claimed a domain can deploy to it. In the portal, or from the command line:
export EE_CDN_TOKEN=<your deploy token>npx -p @evolving-edge/ee-cdn-cli ee-domain claim www.example.com --project proj_abc123 --waitIt prints a TXT record and a CNAME record to add at your DNS provider, then waits until the domain is active. See Custom domains for the portal steps, root domains and Cloudflare.
Moving a live blog? The claim becomes active once its certificate is issued, and that needs the CNAME to point at Evolving Edge already. Pointing the CNAME at Evolving Edge moves your visitors before your first deploy. So have everything ready first:
- Render the site and run a dry run.
- Add the TXT record, then the CNAME record.
- Deploy as soon as the claim is active.
Until that first deploy finishes, visitors get a 404. For a site of a few hundred megabytes, that’s a few minutes.
5. Deploy from your computer
Section titled “5. Deploy from your computer”Install the command line tool once:
npm install -g @evolving-edge/ee-cdn-cliThat gives you ee-deploy and ee-domain. Run them from a folder of your own, not the output folder: the first deploy writes .ee-builder-lock.json where you run it.
Check the package first with a dry run, which packages the site without uploading it:
export EE_CDN_TOKEN=<your deploy token>export EE_CDN_PROJECT_ID=proj_abc123ee-deploy ~/"Sites/blog-output/my-blog-files" --domain www.example.com --trailing-slash --dry-runThen deploy:
ee-deploy ~/"Sites/blog-output/my-blog-files" --domain www.example.com --trailing-slash- Use your own output folder’s path. Keep a leading
~outside the quotes: the shell doesn’t expand it inside them. - Leave out
--trailing-slashif_redirectsis in Publii’s root directory already, or if Pretty URLs is off. - A dry run leaves the package in your temp folder, and prints where.
- Each deploy replaces the whole site on that domain. Allow up to about 90 seconds for it to reach every node.
6. Deploy from the portal
Section titled “6. Deploy from the portal”In your project, upload the contents of the output folder (Publii’s index.html at the top), then create a deployment target with your domain and deploy. A package can be up to 1 GiB. A blog with hundreds of large photos takes several minutes to package. For pretty URLs, add _redirects to Publii’s root directory (step 3): the portal has no --trailing-slash option.
Redeploys and images
Section titled “Redeploys and images”- Every new post re-uploads the whole site. The package changes with any change to the site, so a new post on a 400 MB blog uploads 400 MB again. Deploying unchanged content uploads nothing. See Redeploys and rollbacks.
- Photos take most of the room. Publii already makes resized copies for responsive images. To make the package smaller, see Images, which can convert photos to WebP or AVIF and scale down wide ones while packaging.
What doesn’t carry over
Section titled “What doesn’t carry over”- Publii’s own deployment targets. Publii can upload to FTP, SFTP, Amazon S3, Netlify, GitHub Pages and others, but has no Evolving Edge target. Use manual deployment and
ee-deploy, or the portal. - Subfolder sites. A site owns its whole domain.
Troubleshooting
Section titled “Troubleshooting”| What you see | Why | What to do |
|---|---|---|
| Packaging takes many minutes with almost no CPU in use | The site folder is in iCloud or another sync folder | Move it out, render again |
| Feeds, the sitemap or link previews are missing | Use relative URLs is on | Turn it off in the Manual upload settings, then sync again |
Files named like photo 2.webp in the output |
A sync service kept extra copies | Move the site out of the sync folder, empty the output folder, render again |
/my-post is a 404 but /my-post/ works |
Pretty URLs without the trailing-slash setting | Deploy with --trailing-slash, or add _redirects to Publii’s root directory (Tools → Files) |
ee-deploy: --domain is required |
A domain is needed even for a dry run | Pass --domain with your real domain |
ee-deploy can’t find the folder |
~ inside quotes |
Write ~/"…", with the ~ outside the quotes |
| The deploy is refused for your domain | The domain isn’t claimed for this project, or the claim isn’t active yet | Claim it and wait until it’s active |
No deploy token |
EE_CDN_TOKEN isn’t set |
Export it in the same terminal |
More in the command line troubleshooting.